Stories posted under Pinkbike Community blogs are not edited, vetted, or approved by the Pinkbike editorial team. These are stories from Pinkbike users.
If a blog post is offensive or violates the Terms of Services, please report the blog to Community moderators.
walk through-how to lower a dirt jumper suspension fork
a walk through explaining how to lower dirt jumper forks demonstrated with a dirt jumper 3 2004 with some parts from a 2007 dirt jumper 3ok-this is a walk through guide on how to lower your dirt jumper suspension fork, make sure that you read through this fully before you start and don't attempt it unless you understand and are confident that you can do it, I would recommend that you print this off if you are going to do this so that you can follow it as you go along. Also When working on your fork take notice of where all the parts came from and keep everything clean as bits of grit and dirt can cause damage to the internals of yor fork if it gets in. firstly, i know there is already a thread on this but i would also like to do a story just incase any bits have been missed out or have not been clearly explained. secondly, lowering your forks will probably but most likely void any warranty on them so if they break i will take no responsibility for any damages after lowering your fork.
the tools i used to do this were:
21mm socket(to remove air valves)
12mm socket(to loosen bolts from the bottom of the fork)
hacksaw(to cut the ends off a handle bar)
file (to file the bits off the handle bar)
long screwdriver (just came in handy to poke out the damping rods)
Container or bucket to catch the oil when you drain them
Measuring Jug (to measure out the oil when you refill them)
Right, the first step of lowering your fork is to remove the dust cap from the top of your fork and let all air out of them. Remove the air valves from the top of your fork using a 21mm socket and turn the valves anti-clockwise. do this upright to prevent spillage of the oil. as soon as one of the air valves is off the fork-tip the oil out into a container and dispose of it properly (it is probably best if you put new fork oil in when it comes to putting them back together, unless the oil has been in for very little or no use). repeate for the otherside. the fork should look something like the picture below with the air valve removed![photo]() Now all the oil is out, you will need to remove the springs. this is very simple, just compress the fork and the springs will appear and remove them by pulling on them. when the springs come out,watch for any parts that may come out with them.
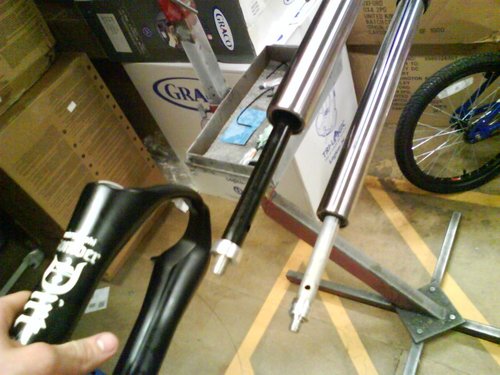
Now all the oil is out, you will need to remove the springs. this is very simple, just compress the fork and the springs will appear and remove them by pulling on them. when the springs come out,watch for any parts that may come out with them.![photo]() now you will need to loosen the bolts from the bottom of the fork to remove the uppers from the lowers. using the 12mm socket(may have to be grinded around the edge to fit in the recess) turn the bolts anti clock wise- you will not be able to tell if they are undone so undo each side at the same time and keep pulling the uppers from the lowers until they come apart
now you will need to loosen the bolts from the bottom of the fork to remove the uppers from the lowers. using the 12mm socket(may have to be grinded around the edge to fit in the recess) turn the bolts anti clock wise- you will not be able to tell if they are undone so undo each side at the same time and keep pulling the uppers from the lowers until they come apart![photo]()
now you will need to remove the damping rods, there is a silver nut type thing on the thread on the damping rod on the picture below, this is finger tight so you will be able to undo this until it comes off. now push the damping rod up the stanchion and it will appear out of the hole at the top. it will be the rod with a spacer and a spring on, this is where you will have to use the bit of handle bar or spacer to lower the fork. find out how much you want to lower your fork by and cut a spacer to that size(e.g-if you have a 100mm travel fork and want 80mm,use a 20mm spacer-or if you have a 110mm fork and want 100,use a 10mm spacer ect-i used a 25mm spacer to reduce mine from 100mm to 75mm) once the spacers are cut use a file to remove any sharp bits that may cause damage and give the spacer a good clean to prvent any bits of metal damaging the internals of your fork. in the picture the white spacer is below the spring but i would recomend putting it so that the white spacer is above the black spacer so the flat end of the spring makes contact with the inside of the fork not the home made spacer. so on the picture it would go from left to right, white spacer, black spacer then spring![photo]() once this is done, push the rod back down the stanchon and put the nut back on the bottom or the rod the correct way round. now repeate this for the other side.
once this is done, push the rod back down the stanchon and put the nut back on the bottom or the rod the correct way round. now repeate this for the other side.
once this is done you can start putting the fork back together. start by sliding the lowers back onto the stanchion and tightening the bolts of the bottom of the fork-once tight, the damping rods will start to spin inside(you wont have rounded it like i first though i did for the first fork i did ).
).
now put your springs in. i had some 07 dj3 springs which are shorter than the 04 which worked nicely, you could also cut your springs down but it is better to get the right sized springs. if you put a spring that is too long in your fork it could put too much strain on the lowers which in time could damage the fork. the correct spring length i would say should be about 5mm above the bottom of the thread of where the air valve goes. once your springs are in-refill the fork with suspension oil (see here for proper oil levels)
now put the air valves back on the fork. it is important that you do not over tighten this. then quicky check the bolts on the bottom of your fork for tightness and the fork is ready to rip.
the fork i built had dirt jumper 3 2004 uppers and dirt jumper 3 2007 lowers and springs-my forks were reduced from 100mm to 75mm. the pictures below are the finished product using the technique above
![photo]()
![photo]() i hope this helps anybody wishing to lower their fork.
i hope this helps anybody wishing to lower their fork.
the tools i used to do this were:
21mm socket(to remove air valves)
12mm socket(to loosen bolts from the bottom of the fork)
hacksaw(to cut the ends off a handle bar)
file (to file the bits off the handle bar)
long screwdriver (just came in handy to poke out the damping rods)
Container or bucket to catch the oil when you drain them
Measuring Jug (to measure out the oil when you refill them)
Right, the first step of lowering your fork is to remove the dust cap from the top of your fork and let all air out of them. Remove the air valves from the top of your fork using a 21mm socket and turn the valves anti-clockwise. do this upright to prevent spillage of the oil. as soon as one of the air valves is off the fork-tip the oil out into a container and dispose of it properly (it is probably best if you put new fork oil in when it comes to putting them back together, unless the oil has been in for very little or no use). repeate for the otherside. the fork should look something like the picture below with the air valve removed

2462449

2462454
2462453
now you will need to remove the damping rods, there is a silver nut type thing on the thread on the damping rod on the picture below, this is finger tight so you will be able to undo this until it comes off. now push the damping rod up the stanchion and it will appear out of the hole at the top. it will be the rod with a spacer and a spring on, this is where you will have to use the bit of handle bar or spacer to lower the fork. find out how much you want to lower your fork by and cut a spacer to that size(e.g-if you have a 100mm travel fork and want 80mm,use a 20mm spacer-or if you have a 110mm fork and want 100,use a 10mm spacer ect-i used a 25mm spacer to reduce mine from 100mm to 75mm) once the spacers are cut use a file to remove any sharp bits that may cause damage and give the spacer a good clean to prvent any bits of metal damaging the internals of your fork. in the picture the white spacer is below the spring but i would recomend putting it so that the white spacer is above the black spacer so the flat end of the spring makes contact with the inside of the fork not the home made spacer. so on the picture it would go from left to right, white spacer, black spacer then spring

2462458
once this is done you can start putting the fork back together. start by sliding the lowers back onto the stanchion and tightening the bolts of the bottom of the fork-once tight, the damping rods will start to spin inside(you wont have rounded it like i first though i did for the first fork i did
now put your springs in. i had some 07 dj3 springs which are shorter than the 04 which worked nicely, you could also cut your springs down but it is better to get the right sized springs. if you put a spring that is too long in your fork it could put too much strain on the lowers which in time could damage the fork. the correct spring length i would say should be about 5mm above the bottom of the thread of where the air valve goes. once your springs are in-refill the fork with suspension oil (see here for proper oil levels)
now put the air valves back on the fork. it is important that you do not over tighten this. then quicky check the bolts on the bottom of your fork for tightness and the fork is ready to rip.
the fork i built had dirt jumper 3 2004 uppers and dirt jumper 3 2007 lowers and springs-my forks were reduced from 100mm to 75mm. the pictures below are the finished product using the technique above

2462462

2462459
Author Info:

 Member since Oct 15, 2007
Must Read This Week
Sign Up for the Pinkbike Newsletter - All the Biggest, Most Interesting Stories in your Inbox
PB Newsletter Signup
2 Comments
- 4 0
damn-if i lowered it to 60mm i could have called it a dj 360
- 3 0
This was perfect. Thanks for putting this together!
Login or Sign Up